
What Is ISO in Photography and Why Is It So Important?
ISO is one of the most foundational elements in photography and a setting that can make or break your image depending on how it’s used. Whether you’re a beginner learning the exposure triangle or an experienced shooter trying to master low-light conditions, understanding ISO is critical for getting the results you want.
In this comprehensive guide, we’ll explore every question you might have about ISO, from the basic definition to advanced tips used by professionals. By the end, you'll know when to use high ISO, how to avoid noise, and how to control ISO for portraits, landscapes, and more.
What Does ISO Stand for in Photography?
The full form of ISO is International Organization for Standardization. It is the body that sets standard values for light sensitivity. In photography, ISO refers to the sensitivity of your camera’s sensor (or film) to light.
Low ISO = Less sensitivity to light (clearer image, requires more light).
High ISO = More sensitivity to light (brighter image, more digital noise).
Raising the ISO helps you take pictures in darker environments without using a flash or requiring more prolonged exposures. Lowering the ISO helps retain clarity, detail, and dynamic range in well-lit settings.
How Does ISO Affect Your Photography?
ISO is used to adjust brightness and exposure. Besides shutter speed and aperture, ISO is one of the three main exposure triangle attributes. These three settings work together to determine the exposure, which is essentially how light or dark your photo is. Here’s how ISO affects your images.
Exposure and Brightness
Increasing the ISO makes your camera sensor more sensitive to light, allowing you to capture brighter images even in low-light conditions, such as indoors or at night. Conversely, lowering the ISO makes the sensor less sensitive to light, which is ideal in bright conditions like outdoor daylight.
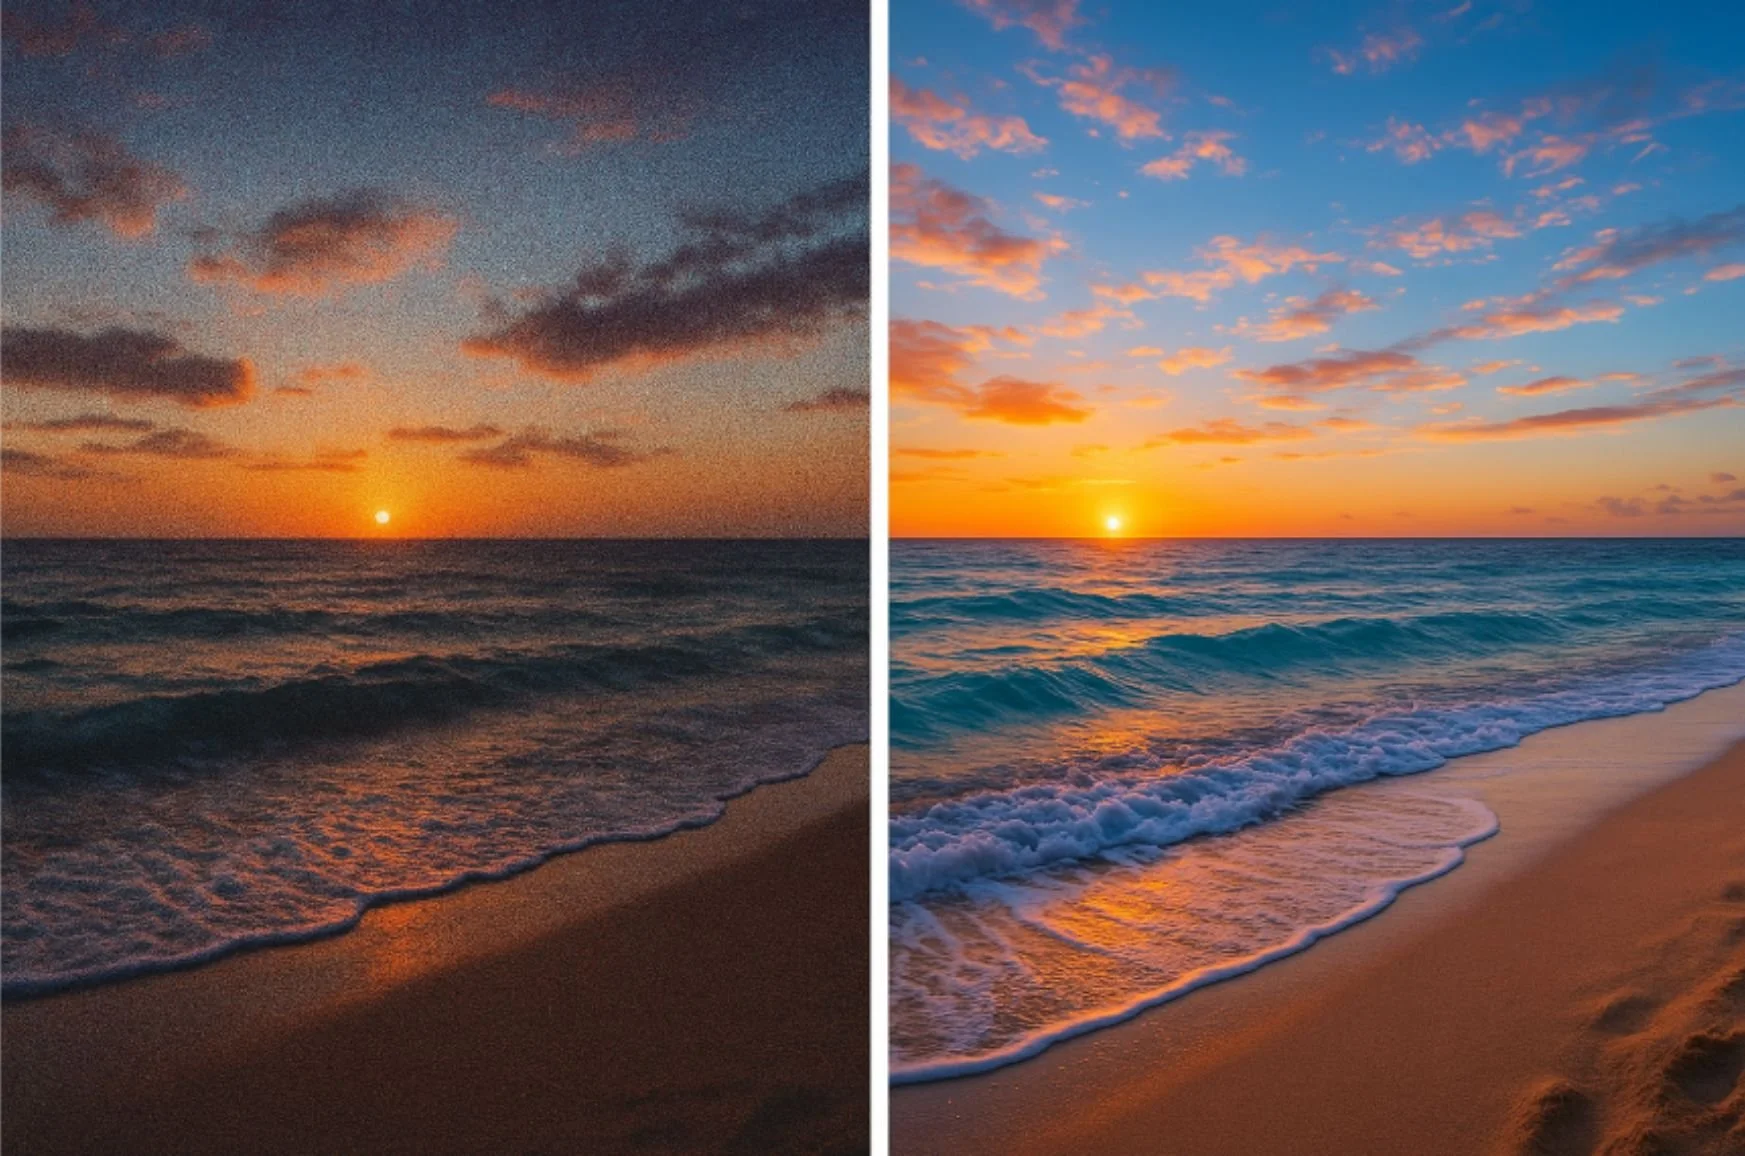
Noise or Grain
As you increase ISO, you introduce noise or grain into your photos. This is particularly noticeable at higher ISO levels. While a bit of noise can sometimes add a creative or gritty feel to an image, too much can make the photo look blurry and unappealing. A low ISO, like 100 or 200, keeps the image clean and sharp, but in low-light situations, you might struggle to get a properly exposed photo without increasing the ISO.
Shutter Speed and Motion
ISO also affects how you can use shutter speed. When shooting at a higher ISO, you can use faster shutter speeds to freeze motion, ideal for action shots like sports or wildlife photography. However, using a lower ISO in low-light conditions might require slower shutter speeds, which can cause motion blur if not carefully managed.
Depth of Field and Aperture
Aperture controls the depth of the field in your image. How much of the scene is in focus? If you're working with a shallow depth of field (a large aperture), you may need to adjust your ISO to compensate for reduced light, especially in darker environments.
What Are the Common ISO Ranges?
Most DSLR and mirrorless cameras offer ISO ranges like:
A low ISO (100-400) is best suited for bright daylight or well-lit indoor settings. Images at these settings tend to be clean with minimal noise.
Medium ISO (800-1600) is suitable for indoor photography with some ambient light or when using a flash. You might start noticing a slight increase in graininess at these settings.
High ISO (3200 and above) is necessary for very low-light situations where you can't use a flash or a tripod. High ISOs can result in noticeable grain or noise, but they allow you to capture images in challenging lighting conditions.
Looking for the best portrait photography in Aruba? Let G10 Studio bring your moments to life with expert ISO control and artistic vision.
When Should You Use Low ISO?
You can use a low ISO when it's
Bright daylight
Landscapes and architecture
Studio photography with lighting
Product photos where clarity matters
Long exposure shots with a tripod
Advantages:
Highest image quality
No visible noise
Best for editing and printing
When Should You Use High ISO?
High ISO can be an ideal choice in
Low-light environments (concerts, indoors)
Nighttime photography
Fast-moving subjects (sports, wildlife)
Events with no flash allowed
Street photography in low light
Caution: Use high ISO only when necessary. Noise becomes harder to manage the higher you go.
Is Auto ISO a Good Option?
Yes, Auto ISO is a great option to get perfect portraits or candid shots. It is convenient when:
You're in changing lighting conditions.
You want to prioritize shutter speed or aperture.
You're shooting handheld and need quick flexibility.
Set a maximum ISO limit in your camera settings (e.g., ISO 3200), so the camera doesn’t push sensitivity too far.
How to Change ISO on Your Camera?
DSLR or Mirrorless Cameras:
Press the ISO button on the top or back.
Use dials to adjust the ISO value.
Some models have an ISO setting in the menu.
On Smartphones:
Use manual or Pro mode in the camera app.
Adjust ISO using a slider (often next to shutter/aperture).
How Is ISO Different from Shutter Speed and Aperture?
ISO
Controls: Sensor sensitivity
Affects: Brightness and noise
Shutter Speed
Controls: Time the shutter is open
Affects: Motion blur or image freezing
Aperture
Controls: Size of the lens opening
Affects: Depth of field and exposure
How Does ISO Work in Portrait Photography?
Portrait photography is the real test of ISO for beginners. ISO is critical in portrait sessions, especially when shooting in low light without a flash, capturing candid moments, or freezing movement without blur.
To get the ideal Portrait, you can use these ISO settings
Studio: ISO 100–200 for crisp detail
Outdoors (Golden Hour): ISO 400–800
Indoor Events: ISO 800–1600
Night or Live Events: ISO 3200+
At G10 Studio, the premier portrait photography studio in Aruba, we precisely manage ISO settings based on the time of day, location, and lighting, ensuring clean, professional results every time.
Can ISO Be Fixed in Editing?
Yes, it can be fixed, but with limitations. Noise reduction can smooth out grain, but it often softens detail too.
You can reduce ISO noise in:
Adobe Lightroom
DxO PhotoLab
Capture One
ON1 NoNoise AI
Tip: Always shoot in RAW format for better editing flexibility.
ISO Tips for Better Photography
Using ISO as a beginner or a seasoned photographer can sometimes be a challenge. To avoid all the trouble, you can follow these tips.
Use ISO 100 whenever light allows.
Avoid ISO over 3200 unless needed.
Use a tripod and a longer shutter speed if possible, rather than increasing ISO.
Experiment with Auto ISO, but set a max ISO limit.
Learn your camera’s noise tolerance at each ISO level.
G10 Studio: Mastering ISO for Stunning Portraits in Aruba
ISO may seem like a simple number, but it controls a significant part of your photo’s look and feel. Learn to manage it well, and you’ll unlock better images, from soft golden-hour portraits to dramatic low-light candids. Balance ISO with aperture and shutter speed. Use it wisely. And remember, it’s not just about brightness, it’s about creating images that feel right.
At G10 Studio, we believe ISO is more than just a setting; it’s a storytelling tool. We fine-tune ISO to match the light, location, and mood of every portrait session in Aruba. Whether it’s a sunrise beach shoot or an indoor lifestyle portrait, we control exposure and noise so your photos stay natural, sharp, and expressive.